As a small business owner, there is always paperwork you need to fill out. Although completing government forms can be tedious, we all know it’s essential to devote time to these forms and make sure they’re completed correctly. If you’ve ever been hired as an employee, you’ll have filled out one of the most important types of employment paperwork, the I-9 form. The I-9 form is a U.S Department of Homeland Security (DHS) form used to identify each employee you hire in the U.S. as eligible to work in this country.
Even though this one form may seem insignificant in the grand scheme of your business, difficulties can arise if you’re not careful and diligent with your I-9 documentation. To make the process easier for you, we’ve developed this I-9 form guide. We’ll break down the I-9 form, discuss what it is, where you can find it, and exactly how you (as well as your employees) need to fill it out in order to be compliant with government regulations.
What Is an I-9 Form?
Once again, the I-9 form is a DHS form used to verify an individual’s identity and eligibility to work in the U.S. Every person you hire as an employee must properly complete an I-9 form. The form is completed by both the employer—you, in this case—and your employee. The employee will confirm their eligibility to work in the United States by providing acceptable identification documents. You, as the employer, will verify their identification documents to confirm their work eligibility and sign the form. An I-9 form must be completed within three business days of the employee’s start date. You must keep an I-9 form for all of your employees.
A little bit of background on the form itself: The I-9 form has been in place to confirm work eligibility since the 1986 Immigration Reform and Control Act. This act, along with other changes to immigration, put into place sanctions on employers that hired undocumented workers into their ranks if they were unaware of their immigration status. Although this act is primarily overseen by the U.S. Immigration and Citizenship Services (USCIS), the I-9 applies to all employees.
Who Needs to Fill Out the I-9 Form?
As mentioned above, every person you hire as an employee of your business needs to fill out an I-9 form. You should note that according to the USCIS, an “employee” is considered someone who performs work in return for pay or remuneration. Remuneration means any other kind of compensation such as food or lodging.
You do not need to fill out an I-9 form for:
- Independent contractors
- Temporary workers hired through an agency
- Individuals employed for casual domestic work in a private home on a sporadic, irregular, or intermittent basis
- Employees not working on U.S. soil
If you hire interns, however, you should fill out an I-9 for them if they are receiving remuneration, as defined above, in exchange for their internship.
If you are self-employed, you do not need to complete an I-9 for yourself, unless you are an employee of a business entity, like a corporation or partnership.
When Do Employees Have to Fill Out An I-9?
As an employer, you should know that not only do you and your employees have to complete the I-9 form but also that law requires that you complete the form within a set timeframe. The entire process must be completed within three business days of the employee’s start date.
Section 1, the employee information section of the I-9, can be completed before the employee’s start date, but not before they’ve accepted the job offer. We’ll break down what each section entails shortly. Section 1 must be completed by the employee on their first day. Section 2, which you’ll complete as their employer, involves the employee’s verification documents. It’s a good idea to ask your new employee to bring this documentation with them on their first day of work so you have enough time to complete Section 2 within the three business day timeframe.
After you’ve completed the process of filling out the I-9, you must retain the form, either on paper or electronically. You must retain each individual’s I-9 form for three years after their start date or one year after their last day of employment, whichever is later.
It’s important that not only do you fill out the I-9 correctly but also that you retain it, as government officials may perform an audit of your business (where you would be asked to present the forms) to check that you’re operating within the law.
Where to Find the I-9 Form
Now that you know that you’ll need to complete an I-9 form for any employee joining your business and within a short time frame, it’s important to know where to actually find the form. The current I-9 form can be found on the official USCIS website, here. All three pages of the form, the supplement (if you need it), as well as the 15 pages of instructions, can be found in this location.
The website has both the printable paper copy form and a fillable electronic form. It’s worth noting that if you use HR software, it might provide you and your new employees the option to fill out the form through the platform. The most basic version of Gusto payroll, Gusto Core, as an example, has this functionality included in their software.
The USCIS website also provides a Spanish version of the I-9 form, however, this version of the form may only be filled out by employers and employees in Puerto Rico.
How to Fill Out the I-9 Form: A Step-by-Step Guide
Now that we’ve taken you through the basic information concerning the I-9 form, we’ll dive in deeper and tell you exactly what you and your new employee need to do to complete the whole process. As we’ve already discussed, every employee joining your team will need to fill out an I-9 and the whole form will have to be completed within three business days of their start date.
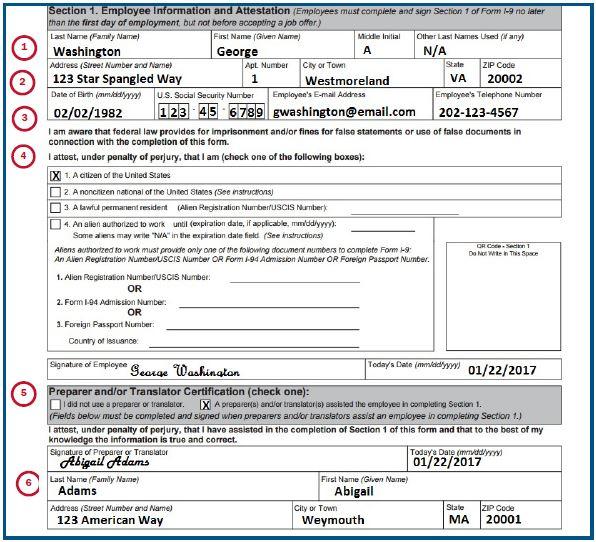
Step 1: Have your employee fill out Section 1 of the I-9 form.
The first step to complete an I-9 is filling out Section 1. This section, again, must be completed, on paper or electronically, by the end of the employee’s first day. It can be filled out as soon as they accept the job offer, but not before.
Section 1 asks for the employee’s basic information—name, address, date of birth, social security number, email, phone number. The employee must then confirm that they’re authorized to work in the United States by checking that they are either:
- A U.S. citizen
- A lawful permanent resident/immigrant
- An individual with work authorization
- Non-citizen national
The employee will fill out the information that corresponds to their respective work authorization status. They must then sign and date the form. Here is an example of Section 1 of an I-9 form filled out correctly from USCIS.
United States Citizen and Immigration Services
You’ll note that there are numbers listed on the left side of this example. If you have any questions about the individual fields in section 1, USCIS breaks down specific case scenarios and details what to do in those instances, like, for example, if an employee has a hyphenated name or doesn’t have a street address. These helpful instructions can also be accessed from the main I-9 page linked above, where you can print or access the form electronically.
The last box you’ll see in Section 1 is the preparer or translator certification. If your employee had either a preparer or translator help them complete the form, that individual must affirm that they assisted by completing this part of Section 1. If the employee used more than one preparer or translator, they can fill out the I-9 Form Supplement. If the employee did not use a preparer or translator they can simply check the box that says “I did not use a preparer or translator.”
Step 2: Have your employee present their verification documents.
As mentioned earlier, it’s good practice to ask your employee to bring their verification documents (as well as any other new hire documentation they need) on their first day of work so that you have enough time to complete the I-9 form within the three business day time frame. You can provide the I-9 form and instructions to the employee ahead of time as well so that they know what documents they need to bring.
The documents an employee can use to verify their eligibility to work in the United States is included as part of the I-9 form. See the chart below.

United States Citizen and Immigration Services
As the chart specifies, the employee must present unexpired documents, either: one from list A (shows identity and authorization) or a combination of one from list B (shows identity) and one from list C (shows authorization). Remember, the employee does not need documents from all three categories, either one from A or one from B & C. Most U.S. citizens either use a passport or passport card (List A) or a drivers license (List B) and social security card (List C).
Federal law says you cannot specify which documents an employee presents and you cannot ask for documents from B and C if the employee provides you one from A or vice versa.
If a newly hired employee is not able to present acceptable documents within the three business day timeframe, their employment should be terminated.
Step 3: Review your employee’s verification documents.
Once your employee has provided their verification documents as specified above, you should review them. You want to make sure that first, they fit the specifications in the list of acceptable documents chart and that they’re not expired. Second, you’ll want to look at the documents to determine if they appear genuine and relate to the employee presenting them.
Many employers make photocopies of the documents, although it is not required that you do so. The only caveat is that if you choose to make copies, you must make them for all employees’ documents, to prevent any violation of anti-discrimination laws. If you’re using HR software to complete your I-9 forms for your employees, you’ll mark off which documents you reviewed on that platform.
You also have the option to use a tool called E-Verify which allows you to verify an employee’s work eligibility online. E-Verify electronically matches information provided by your employee on their I-9 form against records from the Social Security Administration and the DHS. Using this tool is free and completely voluntary, so it’s good to know that you have the option to use it.
Step 4: Fill out Section 2 of the I-9 form.
In Section 2 of the I-9 form, you’ll confirm the details of the verification documents that your employee provided and that you reviewed. Either on paper, electronically, or in your HR software, you’ll fill in the document title, issuing authority, number, and expiration date (if any) based on your employee’s documents. You’ll fill in your employee’s start date at the bottom of this section, fill in your basic information, date, and sign. See a correctly completed I-9 Section 2 below.

United States Citizen and Immigration Services
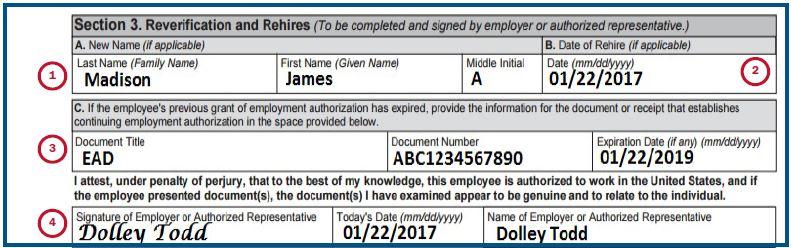
Step 5: Fill out Section 3 of the I-9 form, if necessary.
You will not need to fill out section 3 of the I-9 form for every employee. Section 3 would need to be completed in the following instances:
1. To re-verify employment authorization for current employees
This typically applies to non-U.S. citizens as re-verification is never required for U.S. citizens and noncitizen nationals. In the case that your employee’s authorization document expires, you would use Section 3 to re-verify their employment authorization with their updated documents. This process has to be completed no later than the date their document expires.
2. To re-verify or update employment authorization for rehired employees
In this case, you would be filling in Section 3 because you’ve rehired an employee within three years from the date their I-9 form was previously completed. Instead of filling in a completely new I-9, you can simply complete Section 3 of their original one.
3. To record name changes or other identify-information for current employees.
While it is not required that you fill out Section 3 after an employee has had a legal name change (such as after getting married) USCIS does recommend that you keep the I-9 form up to date with your employee’s most current information, and thus, fill out Section 3.
Here is a correctly completed Section 3 of the I-9 form.
United States Citizen and Immigration Services
Step 6: Store the I-9 form in your records.
Once you’ve signed and dated Section 2, and Section 3, if applicable, the I-9 form is complete. You do not need to actually file this form with USCIS. Instead, the last action you’ll need to take in regards to the I-9 form is to ensure that you keep it safely in your records. If you completed the form through your HR software, the software will store it automatically within the platform. If you’ve filled it out electronically or on paper, you can store the form in any safe storage system, again, physically or electronically. Again, you’ll want to store your I-9 forms and have easy access to them, in case you need to present them as part of an audit of your business by government officials.
Common I-9 Form Mistakes to Avoid
It’s important to note that your business can face a number of different consequences for failing to follow federal law regarding the I-9 form. Not only must all your employees fill out the I-9, but it must be filled out correctly and you must keep it on file. You can face penalties ranging from $200 to almost $20,000, for knowingly allowing individuals to work for you who don’t have the proper authorization, for not having I-9 forms for your employees, or even for filling them out incorrectly. In order to avoid these fines that could be a detriment to your business, you should look out for these common I-9 errors.
- Not having the employee’s name printed in Section 1 of the form
- Not having the employee sign the attestation in each Section
- Not signing each Section yourself
- Not completing Section 2 of the form within the first three business days after the employee’s start date
- Not making sure that a green card or visa holder has added their A number into Section 1
In the end, if you’re diligent about following this process, making sure all required fields are filled in, the proper documentation has been shown, and that you’re keeping accurate records, you shouldn’t have anything to worry about.
I-9 Form: The Bottomline
Although you have a lot of paperwork and other details to worry about as a small business owner, you don’t want to forget about the I-9 form. This one form can cause your business great trouble with the federal government if you’re not making sure it’s filled out correctly and filed, for all your employees, within the appropriate time frame. At the end of the day, when you hire new employees, take time and be conscientious about the I-9 form process—your business will be better off in the long run.
The post I-9 Form: What Is It, Where to Find It, How to Fill It Out appeared first on Fundera Ledger.
from Fundera Ledger https://www.fundera.com/blog/new-i-9-form-changes/
No comments:
Post a Comment