These days, you might not find yourself creating and printing checks in QuickBooks Online too often. You likely pay your bills with online banking, a business credit card, or your bookkeeper uses Bill.com to manage payables for you. That being said, sometimes it’s necessary to create and print checks in QuickBooks Online. So, in this article, I’ll walk you through how to do just that, step by step.
QuickBooks Online Checks
When you create a check in QuickBooks Online, you’re doing something very important in terms of accounting: Creating a check will credit the asset account (i.e. lessen the balance you have in your checking account) and debit the expense/cost of goods account (i.e. increase the expense or cost of goods sold on your profit and loss statement). It could also debit a liability account (i.e.: a loan or credit card), which decreases what you owe. It’s like creating a paper check out of your checkbook.
How to Create a Check in QuickBooks Online
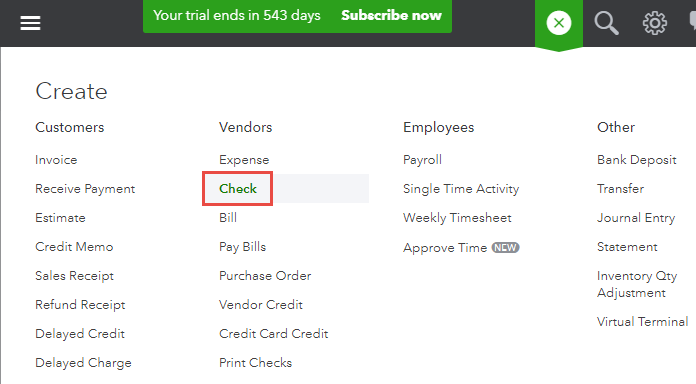
Here is what the check form looks like in QuickBooks Online. From the homepage, click the Quick Create icon (the + sign), select Vendors, and then Check:
If you take a look at the image below, there are several important notes to consider: In QuickBooks Online Plus, I can have the Items tab on the check, so I can buy items to resell. That is a nice touch. QuickBooks Online Plus supports this; they’re called two-sided items and pass through time or material expenses so that a user can create invoices for them. You will also notice Location and Class fields, also a Plus feature. (Check out this video on class/location tracking here if you want to learn more.)
In the check below, I am crediting the Company checking account and then debiting the Rent and Advertising accounts. So it is a “split” transaction. And instead of the check number field, I have decided to print this check later on, which we’ll cover in a few minutes. If I wanted to, I could tag the account amounts to a customer/sub-customer/project for Profitability tracking (see a video on that here) and/or mark the Billable checkbox to pass through (see a video on that here) the expenses to a customer/project.

If I save the check, then click on the More tab/Transaction Journal, here is what this check has done to my general ledger, all just by clicking Save & Close:

It is important to not create a check when there is already a bill, as this will duplicate the expense. You will want to look at the Drawer transactions that will open up to alert you as soon as you tab from the Payee/Vendor field on the check. Note in the pic below, if you already have entered a bill for the same expense, you need to go Pay the Bill, not Create a Check. Pay Bills can be found by clicking the + sign.
Overbooking expense or COGS is something your accountant or bookkeeper might have to clean up, and creating a check while a bill exists instead of making a bill payment is the main culprit. Just worth considering and watching out for.
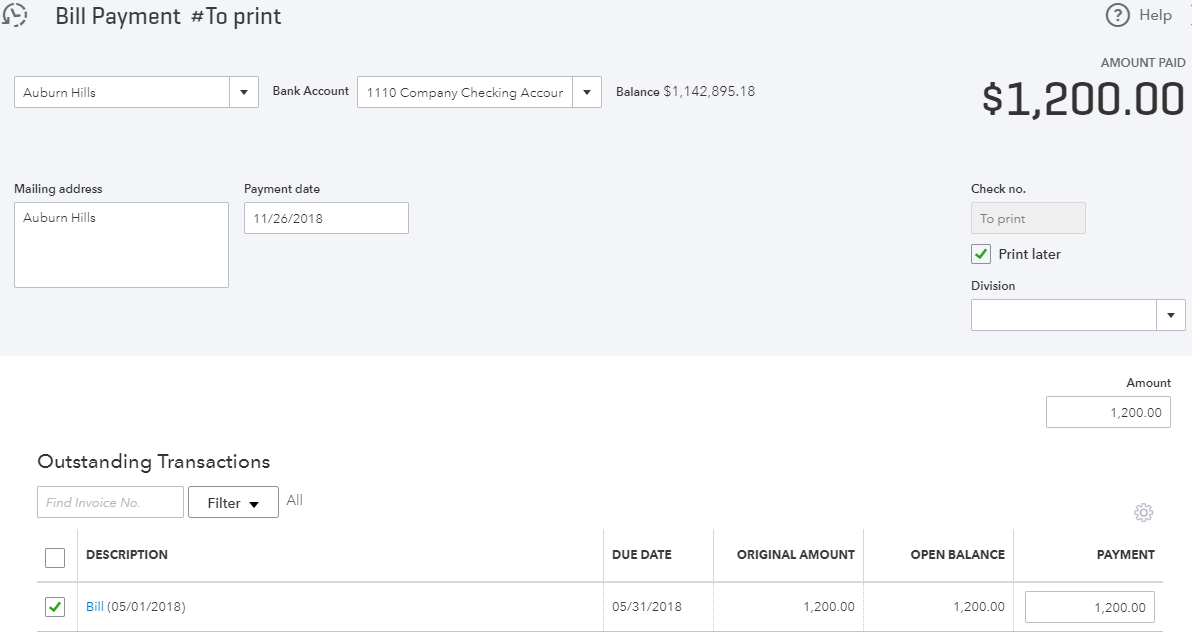
Now, the good news is that when you click on the Add link in the drawer, the Bill is added to the check which converts to a Bill Payment Check, which is the correct way to pay down your Payables.
How to Print Checks in QuickBooks Online
You can print both regular checks and bill payment checks the same way. Quick Create > Vendors > Print Check— see image below.
Let’s walk through printing out the Auburn Hills rent check dated 11/26 for $1,700. First, you will want to click the Print setup tab along bottom of the Print Checks window. You can only align the amount; there are no other check print alignment options.

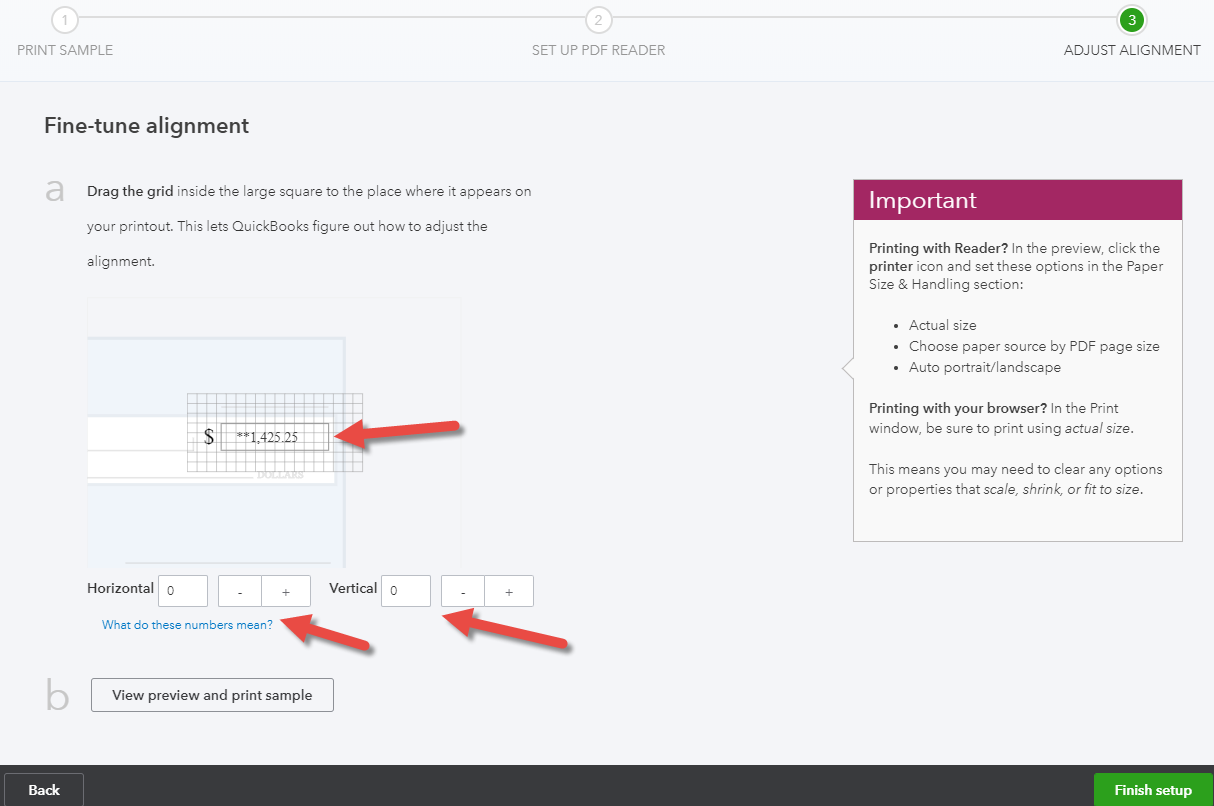
Before you print checks for the first time, make sure you do this alignment wizard. This will ensure that your printed amount lines up properly on your pre-printed check stock. (Note: If you want blank check stock, you’ll need an app for that, like these.) Below is what that wizard looks like.

Click on No, continue setup to get to the amount alignment field. If you know the actual Horizontal and Vertical, you can enter them or hit the +/- keys. Or just grab the dollar amount using your mouse and drag it into position. Then click “View preview and print sample” and keep trying until you get it aligned how you like. Then click “Finish Setup.” Voucher and standard check stock are both supported.
Click on Preview and print tab, and do your thing!
Once you print, you’ll be asked:

Don’t say yes until the check(s) are completely printed. I promise that the minute you say yes and anything isn’t finished, that’s going to be when your printer decides to eat 10 checks, and to reprint them, you’ll have to open each one that didn’t print individually and mark it to be printed and do it all over. No one wants that!
So there you go, that’s how to print checks in QuickBooks Online.
The post How to Write and Print Checks in QuickBooks Online appeared first on Fundera Ledger.
from Fundera Ledger https://www.fundera.com/blog/how-to-print-checks-in-quickbooks-online/
No comments:
Post a Comment