More and more and small business owners are moving away from confusing spreadsheets in favor of accounting software like QuickBooks that makes it easy to track your expenses, set your budget, get organized when tax time comes around, and so much more.
We know how busy you are as a small business owner. And while QuickBooks is a pretty user-friendly platform, it does have tons of little-known features that can help you save even more time while you manage your expenses.
It’s taken me years to become a QuickBooks power user, but today, I’m sharing some of my favorite, sneaky tips so that you can stop wasting time and start getting organized.
Let’s dive in!
1. Bookmark Folders
First, let’s make finding your most frequently visited features simple. You can add features and pages to the bookmarks bar so they are easy to find wherever you are in the dashboard.
You can also create a folder for each part of the workflow or process and save that to your bookmarks bar, and you can have all of the related features or pages in one spot. This works great for new users who are just learning QBO and want to keep track of the important features in the platform. It’s also great for organizing your transaction entry flow.

Here’s how to do it! First, add a folder by right-clicking the bookmarks bar in Google Chrome or whichever browser you use.
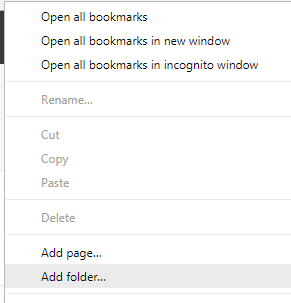
Then name your new folder and add it to Bookmarks bar:

Next, fill it with the forms, lists, and reports involved with the specific process, like invoicing …

… and so on. It is kind of like building out your own QuickBooks power user instruction list!
2. Bank Rules
Another QuickBooks power user move is to tackle some automation in QBO using rules in the bank feed.
After you connect your checking or credit card account to QBO, you will start to see some expense trends in your feed. Meaning, you will notice your business purchasing habits and understand where and how you’re spending your (or your company’s) money. Rather than categorize all of these expenses yourself, let QBO do the categorization for you through the Bank Rules.
You can set them up by clicking the arrow next to Update/Bank Rules, or from the Banking menu in the left-hand panel of QBO, click on Bank Rules tab.
Fill out the appropriate fields, and be specific about the conditions you want the rule to adhere to.
Choose Payee, category (account), even class and location. You can also automate splits here, where an entry might need to go to multiple accounts or classes.
Finally, you’ll see a checkbox at the bottom to auto-add to register once the rule is applied—be careful with this one. With great power comes great responsibility.


Notice how the In Kildal Services downloaded transaction is not captured in the Recognized tab waiting to be batch-added to the register? That is because it is already in the register!
Auto-magic, my fellow QuickBooks Power User.
3. Recurring Transactions
Another way to power automate data entry in QBO is to use recurring transactions. Pair with QB Payments, and you have an auto-debit platform for monthly service fees or vendor payments. Recurring transactions also work with bills and checks, but my focus below is on the sales side.
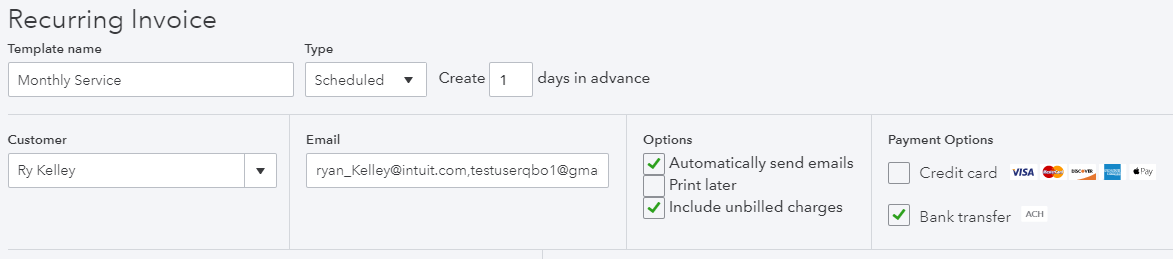
I have my own QBO file for Kildal Services, of course, and my fees are charged monthly. I set up a recurring sales receipt, get signed authorization for ACH payment from my clients, and my income is nearly totally automated. You can find Recurring Transactions access from the Gear icon:

Recurring transactions can be used with pretty much every transaction type except for Receive Payment Against Invoice (for a customer payment, use a sales Receipt), pay bills, and paychecks.

Check out the following recurring sales receipt where I have QB payments active in this file. Every month, the receipt is auto-sent to the customer, payment is auto-fetched from their checking account through a direct ACH draft. Sale is auto-booked.

The screenshot below that is of an invoice. Notice the option to automatically include unbilled charges. That means any time, material, expense of delayed charge I have created and tagged to that customer, QBO includes it on the auto-created invoice. Nothing gets lost! There is no monthly fee for payments in QBO, and no fee if customer payment method is via ACH.
4. Sharing Customized Reports
The last QuickBooks power user maneuver I want to tell you about is sharing a customized report with a different QBO account. This is helpful if you have multiple businesses, or if you’re an accounting professional who supports multiple clients.
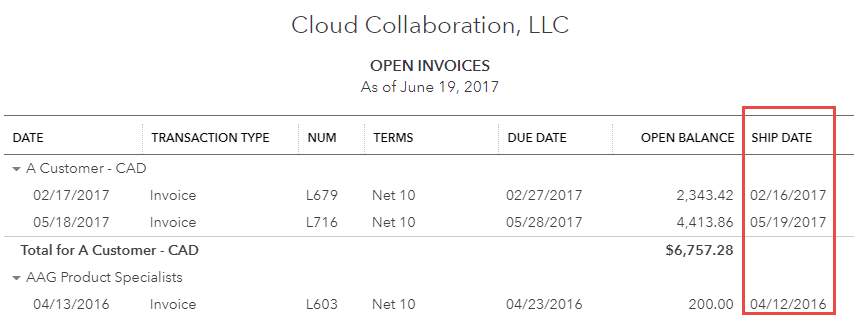
Let’s say you are adding a ship date column to the Open Invoices report, so you click the little gear icon on the right side of report, check off the column, and are happy with what you get:

You want to save the customization but also know this report will work with your second QBO file you use for another one of your business entities.
Because you’re a QuickBooks power user, before you click Save Customizations to save and name your custom report and add it to My Custom Reports, do the following:
1. Copy the URL in web address bar while on the report page.
 2. Next, go to Gear Icon > Switch Company.
 3. Choose the other QBO file you want to share this report with from the list.
 4. When the other QBO file opens, paste the copied URL in the web address line.

The move will create the same report in the other QBO file. Now my example is quite simplistic. Imagine a report that took you a while to customize and you don’t want to do again. The key is to not save your customizations until you copy the URL, or else the trick does not work.
So there you have it, wonderful readers: four sneaky tips to turn you into an QuickBooks power user! I hope these tricks save you time so you can focus on doing what you love best—running your business!
The post Become a Quickbooks Power User with These 4 Sneaky Tips appeared first on Fundera Ledger.
from Fundera Ledger https://www.fundera.com/blog/quickbooks-power-user
http://www.quickbooksonline247.com
ReplyDeleteIn Quickbooks online and the new Quickbooks online is more advanced and the with great function now. It's all advance accounting features make your all accounting task easy and very Quick. It is easy to access and understand. If you face any issue related to your accounting software you can connect with Quickbooks online.
You can also find further details about how to contact our Quickbooks technical team.
Let us guide you our Quickbooks online technical team and resolve your issue related to your business.
We suggest solution to user who experience problem with Quickbooks.our Quickbooks online support expert are well certified and should have good knowledge.